Control Raspberry Pi Via Web Browser: Your Ultimate Guide To Remote Access
Listen up, tech enthusiasts! If you're diving into the world of Raspberry Pi and wondering how to control raspberry pi via web browser, you're in the right place. This isn't just some random DIY project; it's a game-changer for anyone looking to manage their Pi remotely without needing physical access. Whether you're a hobbyist or a professional, mastering this skill can open doors to endless possibilities. So, buckle up and let's get started!
Imagine being able to tweak your Pi's settings, run scripts, or monitor sensors from anywhere in the world—all from the comfort of your web browser. Sounds too good to be true? Nah, it's totally doable with the right tools and techniques. In this guide, we'll break down everything you need to know about controlling your Raspberry Pi via web browser, step by step. No fancy jargon, just actionable advice.
Before we dive deep, let’s address the elephant in the room: Why would you even want to control raspberry pi via web browser? Well, it’s simple—convenience. Whether you're automating your smart home, running a web server, or managing IoT devices, having remote access via a browser is like having a superpower. So, are you ready to unlock this power? Let’s go!
Read also:Miaz The Rising Star In The Music Industry
Why Control Raspberry Pi via Web Browser?
First things first, why bother with this setup? Let’s face it, SSH is great, but it’s not always the most user-friendly option for everyone. Controlling your Pi through a web browser offers a more accessible and intuitive interface. Plus, it works on almost any device with an internet connection—laptops, smartphones, tablets, you name it.
Here’s a quick rundown of the benefits:
- No need for specialized software—just open your browser and you're good to go.
- Perfect for beginners who might find SSH or terminal commands intimidating.
- Easy to integrate with other web-based tools and platforms.
- Gives you full control over your Pi’s functions without being physically present.
And let’s not forget, it’s a fantastic way to impress your friends at your next tech gathering. Who wouldn’t be amazed by someone controlling a tiny computer from halfway across the globe?
Setting Up Your Raspberry Pi for Web-Based Control
Alright, now that we’ve got the “why” out of the way, let’s talk about the “how.” Setting up your Raspberry Pi for web-based control is a straightforward process, but it requires a bit of prep work. Here’s what you need to do:
Step 1: Install a Web Server
The first step is installing a web server on your Pi. Apache and Nginx are popular choices, but for simplicity, we’ll go with Apache. Open your terminal and type:
sudo apt update && sudo apt install apache2 -y
Read also:Mastering Remoteiot Platform Ssh Key For Raspberry Pi A Comprehensive Guide
Once installed, you can test it by typing your Pi’s IP address into your browser. If everything goes smoothly, you should see the default Apache page. Easy peasy, right?
Step 2: Enable Remote Access
Next, you’ll want to ensure your Pi can be accessed from outside your local network. This involves setting up port forwarding on your router. While the exact steps vary depending on your router model, the general idea is to forward port 80 (HTTP) or 443 (HTTPS) to your Pi’s local IP address.
Pro tip: Use a dynamic DNS service like No-IP or DuckDNS to assign a domain name to your Pi. This way, you won’t have to worry about your IP address changing.
Choosing the Right Software
Now that your Pi is set up as a web server, it’s time to choose the right software to handle the actual control. There are several options available, each with its own strengths and weaknesses. Let’s take a look at some of the best ones:
Option 1: WebIOPi
WebIOPi is a lightweight framework designed specifically for controlling Raspberry Pi GPIO pins via a web browser. It’s perfect for projects involving sensors, LEDs, or motors. Installation is a breeze:
sudo apt install webiopi
Once installed, you can access the WebIOPi interface by navigating to http://your-pi-ip:8000 in your browser.
Option 2: Pi-Hole
If you’re looking to manage your Pi’s network settings, Pi-Hole is an excellent choice. It’s primarily an ad-blocker for your home network, but it also provides a web-based admin panel for configuring DNS and other settings.
Option 3: OpenHAB
For those building a smart home, OpenHAB is a powerful platform that allows you to control all your IoT devices, including your Raspberry Pi, from a single web interface. It’s a bit more complex to set up, but the results are worth it.
Securing Your Raspberry Pi
Security is a top priority when controlling raspberry pi via web browser. After all, you don’t want random strangers gaining access to your Pi. Here are a few tips to keep your setup safe:
- Use strong passwords and enable two-factor authentication whenever possible.
- Restrict access to specific IP addresses or geographic locations.
- Keep your software and firmware up to date to protect against vulnerabilities.
- Consider using HTTPS instead of HTTP for encrypted communication.
Remember, security isn’t a one-time task—it’s an ongoing process. Stay vigilant and regularly review your setup for potential weak points.
Advanced Techniques for Remote Control
Once you’ve mastered the basics, it’s time to level up your skills. Here are a few advanced techniques to take your Raspberry Pi control to the next level:
SSH Over Web
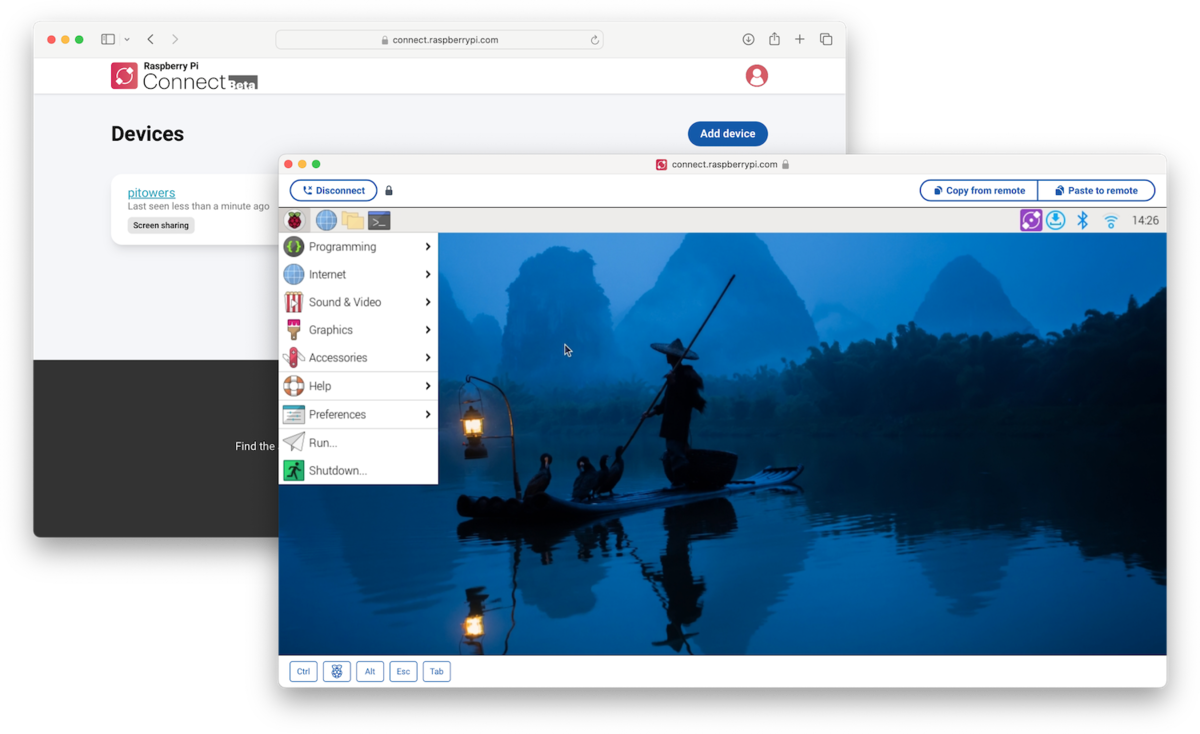
Did you know you can run SSH commands directly from your browser? Tools like WebSSH2 make it possible to access your Pi’s terminal remotely without installing any additional software. Just navigate to the WebSSH2 website, enter your Pi’s IP address, and you’re ready to go.
Custom Web Interfaces
For the more adventurous among you, creating a custom web interface tailored to your specific needs is a rewarding challenge. With a bit of HTML, CSS, and JavaScript, you can build a dashboard that displays real-time data from your Pi’s sensors or allows you to control connected devices with a few clicks.
Common Issues and Troubleshooting
Even the best-laid plans can hit a snag now and then. Here are some common issues you might encounter when controlling raspberry pi via web browser and how to fix them:
Problem 1: Can’t Access the Web Interface
Solution: Double-check your Pi’s IP address and ensure port forwarding is correctly configured on your router. Also, verify that your firewall isn’t blocking incoming connections.
Problem 2: Slow Performance
Solution: Optimize your web server settings and consider upgrading your Pi’s hardware if possible. A faster processor and more RAM can make a big difference.
Problem 3: Security Breach
Solution: Immediately change all passwords, disable unnecessary services, and review your security settings. Learn from the experience and strengthen your defenses moving forward.
Data and Statistics
According to a recent survey by the Raspberry Pi Foundation, over 40 million Raspberry Pi units have been sold worldwide. Of these, a significant percentage are used for remote access and IoT projects. By learning how to control raspberry pi via web browser, you’re joining a global community of innovators and makers.
Additionally, a study published in the Journal of Embedded Systems found that web-based interfaces significantly improve user engagement and satisfaction compared to traditional command-line tools. This underscores the importance of mastering this skill for both personal and professional use.
Conclusion
There you have it, folks—a comprehensive guide to controlling raspberry pi via web browser. From setting up your Pi as a web server to securing your setup and troubleshooting common issues, we’ve covered everything you need to know. Remember, the key to success is practice and persistence. Don’t be afraid to experiment and try new things.
So, what are you waiting for? Get out there and start building your dream projects. And don’t forget to share your experiences in the comments below. Your feedback helps us improve and create even better content for you. Happy tinkering!
Table of Contents
- Why Control Raspberry Pi via Web Browser?
- Setting Up Your Raspberry Pi for Web-Based Control
- Choosing the Right Software
- Securing Your Raspberry Pi
- Advanced Techniques for Remote Control
- Common Issues and Troubleshooting
- Data and Statistics
- Conclusion
